| AudioMulch Help > Working in the Patcher Pane | Previous Next |
Routing MIDI in the Patcher Pane
You can route MIDI messages in the Patcher Pane by connecting MIDI patch cords from a MIDI output on one contraption to a MIDI input on another contraption. MIDI routing is usually used in conjunction with VST and (on Macintosh) Audio Unit plugins.
When to use MIDI routing in the Patcher Pane
You use MIDI patch cords in conjunction with AudioMulch's MidiIn and MidiOut contraptions and with VST and Audio Unit plugins. AudioMulch's MidiIn contraptions let you route MIDI messages from external MIDI sources (such as keyboard controllers, drum pads or sequencers) into a patch. AudioMulch's MidiOut contraptions let you send MIDI messages to external devices (such as hardware synthesizers, drum machines and effects units).
Common uses of MIDI routing in the Patcher Pane include:
- Using an external MIDI source (such as a keyboard controller, drum pad or sequencer) to "play" a virtual instrument plugin. Do this by connecting a MIDI patch cord from a MidiIn contraption to a VST or Audio Unit plugin.
- Transforming a stream of MIDI data using a MIDI processing plugin (VST or Audio Unit), to create results including pitch transposition, delay, velocity processing and to filter key ranges. Do this by inserting a MIDI processing plugin between a MIDI source and MIDI receiver contraption.
- Using a MIDI source contraption (such as a MIDI sequencer, arpeggiator, or on-screen keyboard plugin) to "play" a virtual instrument plugin. Do this by connecting a MIDI patch cord from the MIDI source contraption to a VST or Audio Unit plugin.
- Controlling an external MIDI device, such as a hardware synthesizer or effects unit from a MIDI sequencer plugin. Do this by connecting a MIDI patch cord from the plugin to a MidiOut contraption.
Note: MIDI routing in the Patcher Pane is distinct from AudioMulch's MIDI Parameter Control features.
Contraption MIDI inputs, outputs and MIDI patch cords
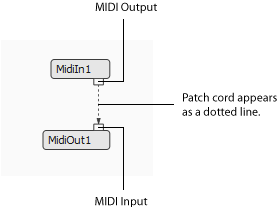
MIDI inputs and outputs are displayed on the top right and bottom right sides of contraptions. This is in contrast to audio inputs and outputs, which are displayed on the left side. Patch cords carrying MIDI messages appear as dotted lines in the Patcher Pane.
MIDI outputs can only be connected to MIDI inputs. A MIDI output can't be connected to an audio input nor an audio output to a MIDI input.
Connecting MIDI patch cords
| To connect a MIDI patch cord: |
|---|
Note:
|
Things to keep in mind when connecting MIDI contraptions
- MIDI patch cords carry all 16 channels of a MIDI data stream. However, many plugins are designed to receive data from a single channel only. You can filter which channel is routed to the plugin using the Parameter Control window. See the VST and (on Macintosh) Audio Unit plugins modules for details.
- Any plugin with outputs (MIDI or audio) must be connected directly (or indirectly) to either a MidiOut or SoundOut contraption to operate.
Disconnecting MIDI patch cords
| To disconnect a MIDI patch cord: |
|---|
Note: The same methods are used for disconnecting audio patch cords. The Ways to Connect and Disconnect Contraptions module has images that demonstrate this. Refer to that module if you need extra assistance with disconnecting patch cords. |
See Also
- Contraption Inputs and Outputs
- Ways to Connect and Disconnect Contraptions
- Controlling AudioMulch Parameters from MIDI
- MidiIn / MidiOut contraptions
- VST Plugins
- Audio Unit Plugins
| Previous Next |