| AudioMulch Help > Working in the Patcher Pane | Previous Next |
Ways to Connect and Disconnect Contraptions

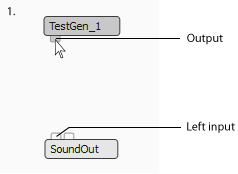
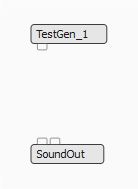
In AudioMulch you can connect contraptions together in several different ways. Contraptions are always connected with patch cords. You can see these in the screen shot above: they are the lines that join the outputs to inputs of contraptions. Inputs and outputs can be seen on the tops and bottoms of the contraptions. Audio flows in the direction of the arrows on the patch cords. Once audio enters the SoundOut contraption, it is routed to your computer's audio output.
When you connect MIDI inputs and outputs together, the patch cords appear dotted, not as solid lines like those in the image above. You can connect audio outputs to audio inputs and MIDI outputs to MIDI inputs; you cannot connect an audio output to a MIDI input or vice versa.
In this module we show you the various ways of connecting contraptions, how to reconnect patch cords, and describe shortcut menu items that relate to connecting contraptions together.
Connecting and disconnecting contraptions with single patch cords
| To connect contraptions together: |
|---|
|

| To disconnect contraptions: |
|---|
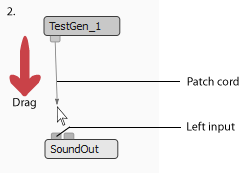
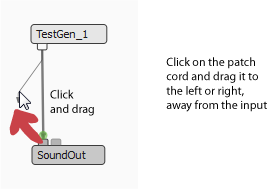
First, click on the patch cord to select it.
Then, do one of the following:
|

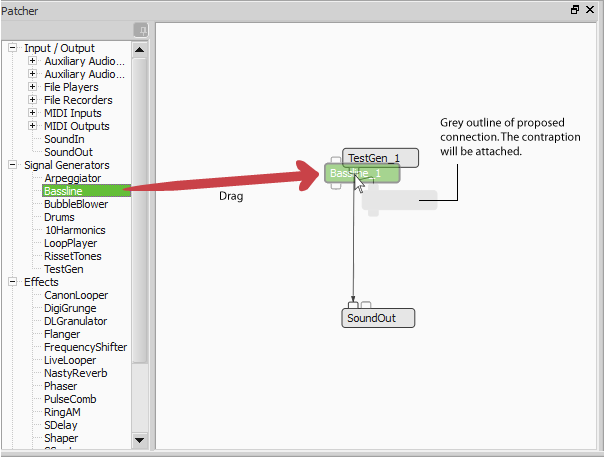
Connecting contraptions by dragging them over one another
| To connect contraptions together: |
|---|
This operation has two modes: (1) when the mouse pointer is just above an input (or below an output) the new contraption is inserted between the existing patch cords; (2) when the mouse pointer is over the contraption you are connecting to, the new contraption is attached separately, alongside any existing patch cords.
|


Connecting and disconnecting multiple patch cords
Multiple patch cords may be taken from any output and joined to any input. When multiple cords are joined to an input the signals are automatically mixed. In more complex patches, Buses or Mixers can be used to combine multiple outputs into a single input.
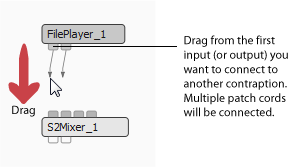
You can connect multiple patch cords one at a time as described above. You can also connect multiple patch cords all at once.
| To connect multiple patch cords at once: |
|---|
These instructions apply when connecting one multichannel contraption to another multichannel contraption (e.g. connecting a FilePlayer to an SMixer).
Note:
|
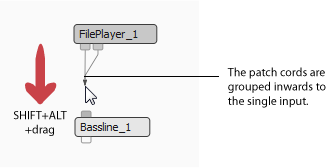
| To connect multiple patch cords to a single input: |
|---|
|
| To connect a single output to multiple inputs: |
|---|
|


| To disconnect multiple patch cords at once: |
|---|
First, select the patch cords you want to delete using one of the following methods:
Then, do one of the following to delete the cords:
|


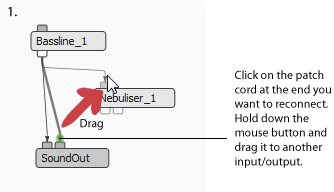
Reconnecting patch cords
You can reconnect patch cords. This means you can click on a patch cord at either end with the mouse, and drag it to the input or output of any other contraption to reconnect it.
You can also reconnect multiple patch cords at once. If multiple cords are connected to an input or output and you only want to reconnect specific cords from the group, you must select them before they can be reconnected. If no cords are selected, all the cords connected to a point will be reconnected simultaneously. See below for information on how to perform these actions.
| To reconnect a single patch cord when there is more than one cord connected to a point: |
|


| To reconnect multiple patch cords at once: |
|---|
To reconnect all the patch cords connected to a contraption at once:
To reconnect specific patch cords, do one of the following:
OR
Note: You can use the click+drag method outlined in step 1 above to select patch cords that are next to each other, or all of the patch cords. |


Patcher shortcut menu
You can open the Patcher Pane's shortcut menu by right-clicking (CTRL+left-click on Macintosh) on a contraption or group of selected contraptions.

This shortcut menu gives you quick and easy access to functions that help you edit the structure of the patch. Using the shortcut menu lets you rearrange contraptions more easily and makes it possible to maintain uninterrupted audio while you restructure the patch.
| Menu Item | What it does |
|---|---|
| Replace | Deletes the highlighted contraption and inserts a newly selected contraption in its place. |
| Substitute | Removes the highlighted contraption from the signal path and inserts a newly selected contraption in its place. The original contraption is disconnected and left in the Patcher Pane to be used later. |
| Insert Before | Inserts the new contraption into the patch before the highlighted contraption. |
| Insert After | Inserts the new contraption into the patch after the highlighted contraption. |
| Insert | Inserts a new contraption into the patch. Only available when right-clicking (CTRL+left-click on Macintosh) on patch cords. Note: when inserting a stereo contraption into a mono path only the left side of the new contraption will be connected. To insert a stereo contraption into a stereo path both patch cords must be selected. |
| Swap | Swaps the position of two contraptions. Can be used to swap contraptions between parallel signal paths or to change the order of contraptions within a common path. You can only use Swap when two contraptions are selected. |
| Bypass | Removes the highlighted contraption from the signal path. The contraption is disconnected and left in the Patcher Pane to be used later. |
See Also
| Previous Next |