| AudioMulch Help > Contraption Reference > Effects | Previous Next |
LiveLooper
Captures and controls up to 16 tracks of looping sound.
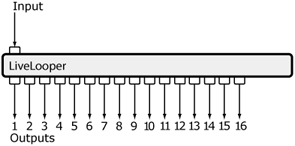
LiveLooper records and plays back up to 16 synchronized loop tracks. Each track can be a different length and a number of options are provided for starting and stopping tracks independently, or in sync with each other.
 |
This contraption synchronizes to the global clock when using Sync to mode. Remember to press play. |
 |
See the Adjusting Contraption Properties section for information about using sliders, knobs, presets etc. |
Related Contraptions
Parameters
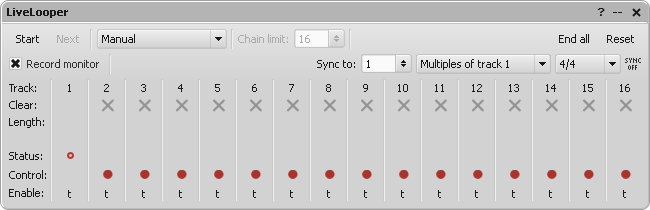
Start/Stop (RecordActive) |
Starts or stops recording. Depending on the Record Mode and Sync to settings, recording may not start immediately, but will start or stop at the next synchronization cycle boundary (see the Sync to parameter below). |
Next (NextRecordTrack) |
Advances the recording process to the next track. Use Next when recording a chain of tracks in Manual mode to advance recording to the next track. In the Auto-chaining modes, recording is advanced automatically, and the Next button will only be enabled for recording the first loop in Auto-chain (fixed) mode or the first loop of each chain in Auto-chain (variable) mode. In all modes, the next track will start recording at the next synchronization cycle boundary (see the Sync to parameter below). |
Manual/Auto-chain (fixed)/Auto-chain (variable) (RecordMode) |
LiveLooper has 3 record modes: Manual, Auto-chain (fixed) and Auto-chain (variable). In Manual mode, you control everything. Press the Start/Stop button to start and stop recording, and advance recording to the next track with the Next button. Once the first track has been recorded, each subsequent track can be a different length (see the Sync to section below to see how these lengths are related). In Auto-chain (fixed) mode each track is recorded with the same length as Track 1. Recording is always advanced to the next track once this length has been reached. Tracks will be recorded one after the other until the Chain limit is reached (see the Chain limit parameter below). If you want to stop recording before the limit is reached, press the Stop button. If you start recording more tracks later LiveLooper will continue to automatically advance to the next track when the current track reaches the same length as Track 1. Auto-chain (variable) mode works like Auto-chain (fixed), except that the first loop of each chain (and hence all the other loops in that chain) can be a different length. |
Chain limit (ChainedTrackLimit) |
Determines how many tracks will be recorded one after the other once Start is pressed. This setting applies to the Auto-chain modes. |
Sync to |
Tracks are recorded in sync with each other so that their loop lengths match. The boundaries at which recording starts and stops are called synchronization cycle boundaries. When you press Stop or Next, recording will stop, or advance, when the next synchronization cycle boundary arrives. With the default settings, Track 1 can be any length, and all subsequent loops will be multiples of Track 1's length. It is possible to make the synchronization boundaries occur at multiples or subdivisions of Track 1 by selecting Multiples of Track 1 or Subdivisions of Track 1 from the drop-down list to the right of Sync to. Select the multiple or subdivision you want using the number edit box. The Clock Bars setting, also in the drop down list to the right of Sync to, lets you synchronize tracks to the global clock. Enter the number of bars (or a decimal fraction of a bar) into the number edit box. |
End all |
Stops all currently playing tracks. Each track will stop according to its own Enable mode. |
Reset |
Allows you to clear all tracks. You will be prompted to confirm the operation before it proceeds. |
Record Monitor (RecordMonitor) |
When checked, passes the LiveLooper's input through to the output channel corresponding to the Track being recorded. When unchecked, the corresponding output channel will be muted during recording. This parameter cannot be changed during recording. |
Tracks |
For information about all parameters in the Track Grid, see Instructions below. |
Instructions
Tracks
LiveLooper supports recording and playback of up to 16 tracks. Each track has a separate audio output. While recording, the input is played through to the track's output if the record monitor check box is checked. Once recorded, each track can be started and stopped independently, although they will always maintain synchronization with the other recorded tracks. The Property Editor contains a Track Grid, consisting of 16 columns. The grid contains information about each track and lets you control the tracks. The various indicators and controls in the grid are described below.
Clear
Use the Clear button ![]() , at the
top of each column (except Track 1) to clear a recorded loop (during playback
or while stopped). When you click Clear, a confirmation dialog pops up to
ensure you don't accidentally delete a track. Holding down Ctrl on a PC, or
Option on a Mac when clicking Clear bypasses the confirmation dialog and
automatically clears the track.
, at the
top of each column (except Track 1) to clear a recorded loop (during playback
or while stopped). When you click Clear, a confirmation dialog pops up to
ensure you don't accidentally delete a track. Holding down Ctrl on a PC, or
Option on a Mac when clicking Clear bypasses the confirmation dialog and
automatically clears the track.
Track 1 provides master timing information that the other tracks depend on. Once track 1 is recorded it cannot be cleared unless you click on Reset.
Length
The Length indicator displays the track's length as a fraction or multiple of Track 1's length. For example, a value of 2 indicates a track twice the length of Track 1, a value of 11/3 indicates a length that is eleven thirds of Track 1's length. If the length ratios are complicated, the value will be displayed as an approximate decimal value.
Location
Each recorded track displays a circular location indicator, which indicates the current playback position of each track (even if the track is stopped). This makes it easy to see when each track will reach the end of its cycle.
Status
The Status indicator displays an icon indicating the current status of each track, which can be one of the following:
![]() The track is
empty, no sound has been recorded into it.
The track is
empty, no sound has been recorded into it.
![]() The track will
be the next track recorded. You can click the record button on any empty track
to select it as the next track to record into.
The track will
be the next track recorded. You can click the record button on any empty track
to select it as the next track to record into.
![]() The track
is armed for recording. As soon as the next synchronization point arrives, the
track will start recording.
The track
is armed for recording. As soon as the next synchronization point arrives, the
track will start recording.
![]() The track is
recording.
The track is
recording.
![]() The track is
recording but will finish recording and start playing as soon as the next
synchronization point arrives.
The track is
recording but will finish recording and start playing as soon as the next
synchronization point arrives.
![]() The track is
recording but will finish recording and stop as soon as the next
synchronization point arrives.
The track is
recording but will finish recording and stop as soon as the next
synchronization point arrives.
![]() The track has a
loop recorded into it, but it is currently not playing, it is stopped.
The track has a
loop recorded into it, but it is currently not playing, it is stopped.
![]() The
track is stopped, but will begin playing as soon as the next synchronization
point arrives.
The
track is stopped, but will begin playing as soon as the next synchronization
point arrives.
![]() The track is
playing.
The track is
playing.
![]() The
track is playing, but will stop as soon as the next synchronization point
arrives.
The
track is playing, but will stop as soon as the next synchronization point
arrives.
Control
The Control button lets you control the activity of each track. When the
track is empty, the  Record button
is displayed. Clicking on it will make the track the next one to be recorded
(the Status indicator will reflect this).
Record button
is displayed. Clicking on it will make the track the next one to be recorded
(the Status indicator will reflect this).
Note: Recording is started and stopped using the Start/Stop and Next buttons at the top left of the Property Editor.
Once a loop has been recorded to a track, it can be started and stopped with
the Control button. When the track is playing, the  Stop button is displayed. Clicking on it
will stop the track. When the track is stopped, the
Stop button is displayed. Clicking on it
will stop the track. When the track is stopped, the  Play button is displayed. Clicking on it
will start the track.
Play button is displayed. Clicking on it
will start the track.
Note: Depending on the Enable mode, the track may not start or stop immediately.
Enable (Enable mode)
Each track has a pop-up menu to set its Enable mode. To access this menu, click on the button in the Enable row, at the bottom of each track's column. The Enable mode determines when each track will be started or stopped. This allows each track to be brought in and out of sync with Track 1, or with its own cycle (for example, always starting to play at the start of a cycle, and ending at the end of a cycle). The Enable modes and their abbreviations are described below.
Immediate (i) The track will start and stop in direct response to the Control button.
End of Track (t) The track will wait until the end of its loop before it stops or starts playing.
End of Sync Cycle (s) The track will wait until the end of the synchronization cycle before it stops or starts playing. See the description of the Sync to controls above for more information about the synchronization cycle.
End of Track 1 (1) The track will wait until the end of Track 1's loop before it stops or starts playing.
End of Composite Cycle ( c ) The track will wait until all tracks end simultaneously before it stops or starts playing. The length of the composite cycle depends on the lengths of different tracks. Depending on when you start recording each track it is possible for a composite cycle to never occur.
Relevant Example Files
The following files provide some examples of how LiveLooper can be used:
DrumLooper.amh & LooperJam.amh
 |
To open the Example Files directory, go to the File menu, select Open, and double-click on the Examples folder. Read descriptions of the example files here. |
| Previous Next |